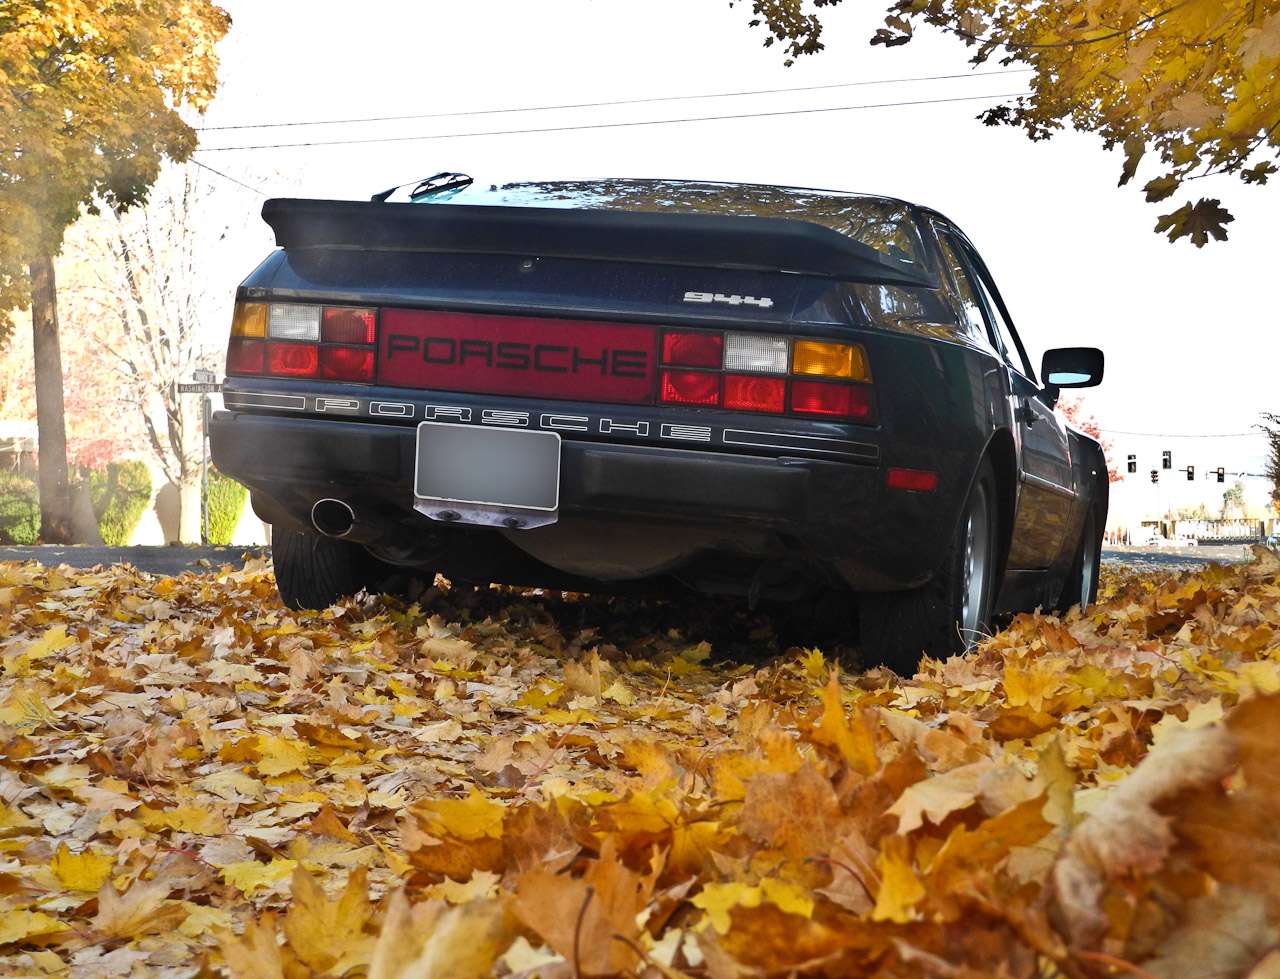
Herman sends along this sighting he made today during a drive with Red Annie.


Herman sends along this sighting he made today during a drive with Red Annie.
Stopping to visit my mother-in-law late this afternoon, I see that her front step was the venue of an alien invasion. I sensed my opportunity to test the “deer in the headlights” theory, only to find that the animals briefly noticed, then leisurely sauntered off, just a few feet from me. Well, it really wasn’t that dark yet. And by the time I turned on the headlights, the deer were gone, but I wanted to see how badly my crooked driver front fender affected the headlight beam. This is the best we have been able to aim it, so I try to avoid extensive night driving. But it might be good for deer capture. Tomorrow: off to Eric’s shop to work on the prep for my replacement fender. Till then …


Just happened upon some very old photographs. First, not long after acquiring the 1966 Bahama Yellow 911, equipped with dogleg-first 5-speed, Weber carbs, gold script and badging and, of course, Pirelli tires:

And later, by 1969 the thing was running Firestone wet/dry “gold stripe” competition tires (forgotten the size now, but not the fact that the tread wore very fast) on wider wheels but still preserving basic stock appearance. (Probably was triggered by a late night indiscretion in which I was waxed by an aggressive Mini Cooper.) Later to come, Bursch exhaust, and I forget what else. Never did make the plunge for Fuchs.

The time has come. The Blue Rascal is now in wonderful driving and operating condition, after several months of various fixes and tweaks. Winter’s comin’ on. So maybe we can finally start addressing the various body/paint anomalies, starting with that nasty front driver’s side fender.
My intention is keep driving the Rascal throughout the seasons, as that is easily the most pleasurable aspect of ownership for me, so only a chunk at a time will be targeted. I know it would be tempting to disassemble the whole darn thing and put it back together, but where would that end up? I have neither the time nor funds for a complete redo, so we will just try to get it straight and a bit less bottom-feeder in its stage presence.
So, under rainy skies, I toss my spare fender into the Hardbody (aka Nissan D21) and head for Eric’s shop. Eric has most graciously made his shop available on Saturday mornings, beyond normal business hours, to me and a few others to work out our demons, under his watchful and learned eye. We inspect the fender, Eric taps out a few hill-and-valley spots — this is a 28-year-old used fender, after all — and we remove the side molding and start a little preliminary sanding to expose the uneven spots.


Mostly today I look in on Chris and his work, hoping to pick up a little savvy. Chris is not only a dyed-in-the-wool car guy and a fellow gray-hair, but we find lots of room for discussion in another mutual interest area — photography. Chris was once a photographer in the Marine Corps. Chris’ current project is restoring a ’52 Chevy sedan delivery and today he is working on the single biggest challenge he has: rebuilding the rear door. When he started, he had to build up some 8 or 10 inches of new material to the door bottom and weld in about two-thirds of the outside panel in new metal. The Blue Rascal’s needs seem to be child’s play by comparison. (Or at least I hope so.)


Herman passes along this photo of a 356 he spotted along the street earlier this year in Paris. Herman’s travel show, right here.

UPDATE: Herman adds that this scene is “… on Rue Saint-Honoré, which is, not surprisingly in the chic-chic shopping area of Paris. Think Gaultier, LV, de la Renta and $5,000 purses.” I am guessing that nice 356es are as precious there as they have become in this market, too.
 Ethanol-free gas, definitely preferred for a 944, isn’t so easy to find these days. Here is a site that accumulates information on locations where you can get the stuff; well over 7,000 stations are in its database now.
You can also download a POI (Point of Interest) file from the site for import into most GPS devices.
This is the final installment of our project to convert my defective 85.5 NA power sunroof to strictly manual operation. This will be accomplished basically by installing manual rear sunroof latches in place of the original powered counterparts. See Part 1 and Part 2 for steps that lead us up to this point.
GETTING IT TOGETHER
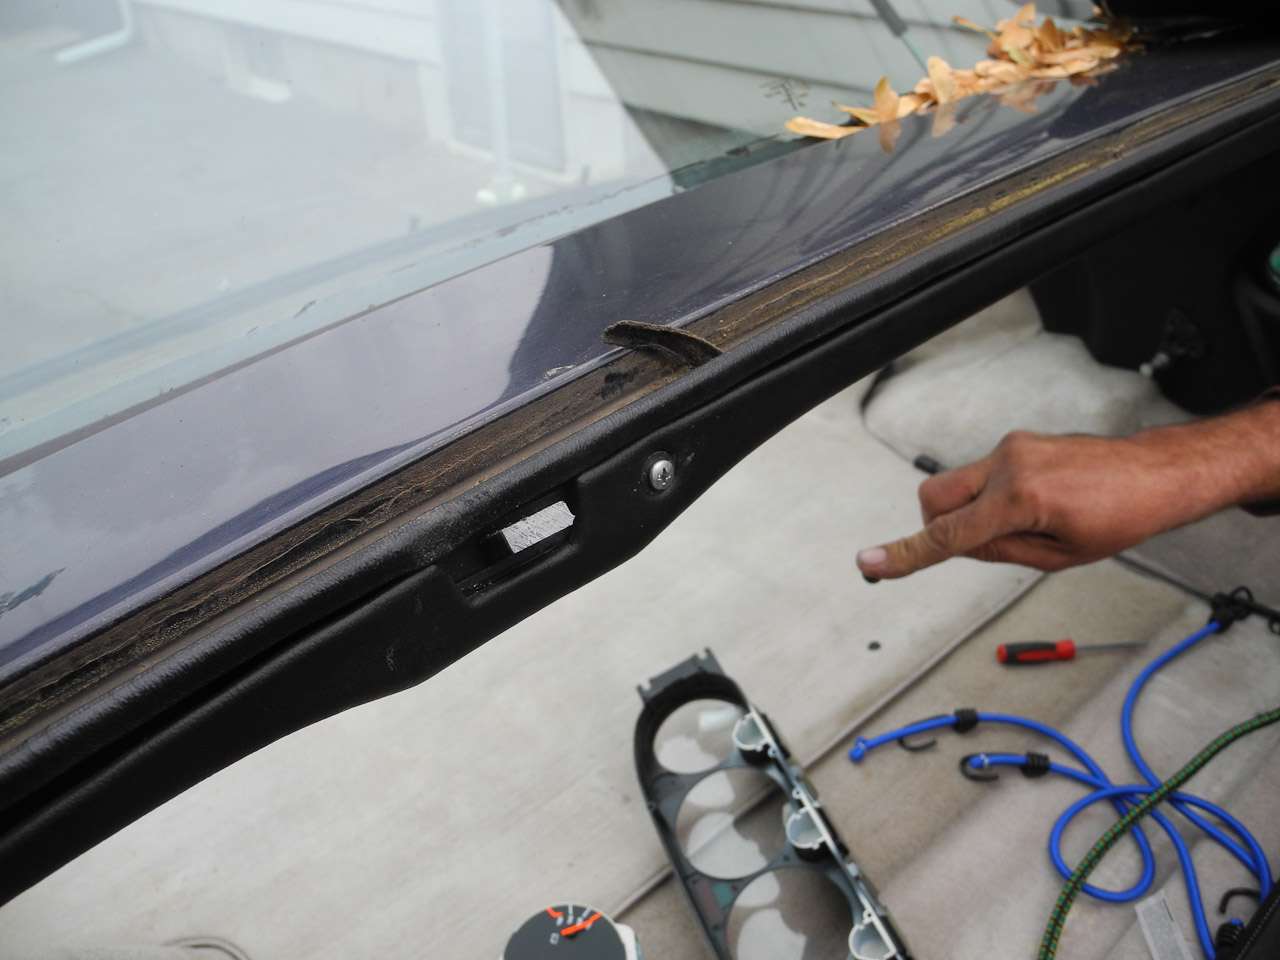
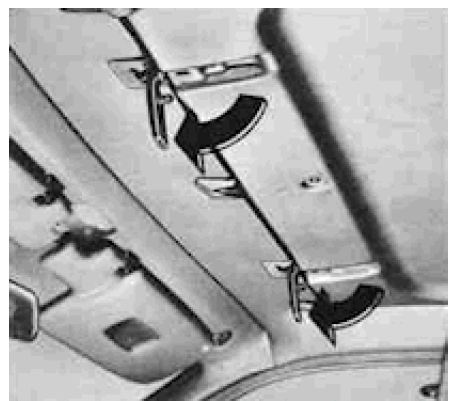
By now we know that the used manual latches (I don’t know their origin; I suspect a 924 or maybe an early 944; I have never seen such a thing on a late 944, but there’s much I have yet to see) I found on eBay bolt right up to the sunroof, so now we have to do a final trim and fit. What’s important here is to provide clearance for the spring-loaded latches to open and swivel to permit sunroof removal.
-1

-2

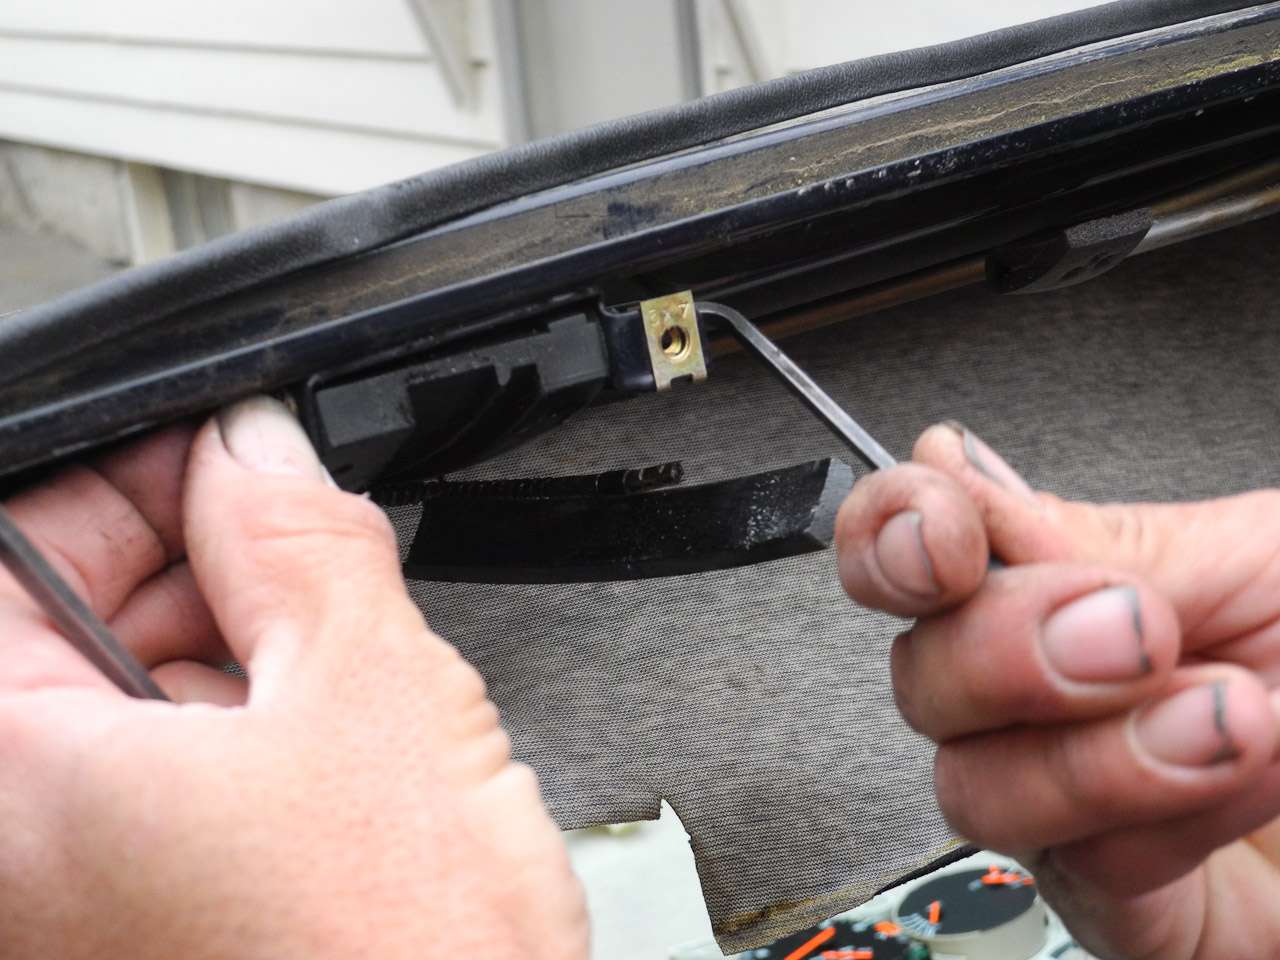
First, we mark the headliner fiberboard for a cut mark to be made on its underside. Then we carefully pull the vinyl (I guess that is what the material is) at its edges away from the backing board, trace the cutout marks on the board’s underside, and cut away to give us a wider path for the latch. Then we delicately wrap the loosened vinyl over the new cut margins, slicing and trimming so that no seam or cutline will be visible from inside the cabin. Finally, we reattach the newly-formed vinyl flaps with adhesive.
-3

-4

-5
-6

To better protect the inner sunroof tensioning and foam pieces, we build up a little structure by wrapping some aluminum tape on the inside flange of each latch socket. Then we overlay this shiny stuff with something that will blend into the dull black color of the headliner itself. Turns out that a few layers of some matte black gaffer’s tape I happen to carry with me will do the trick.
-7

-8

4292-6 -9

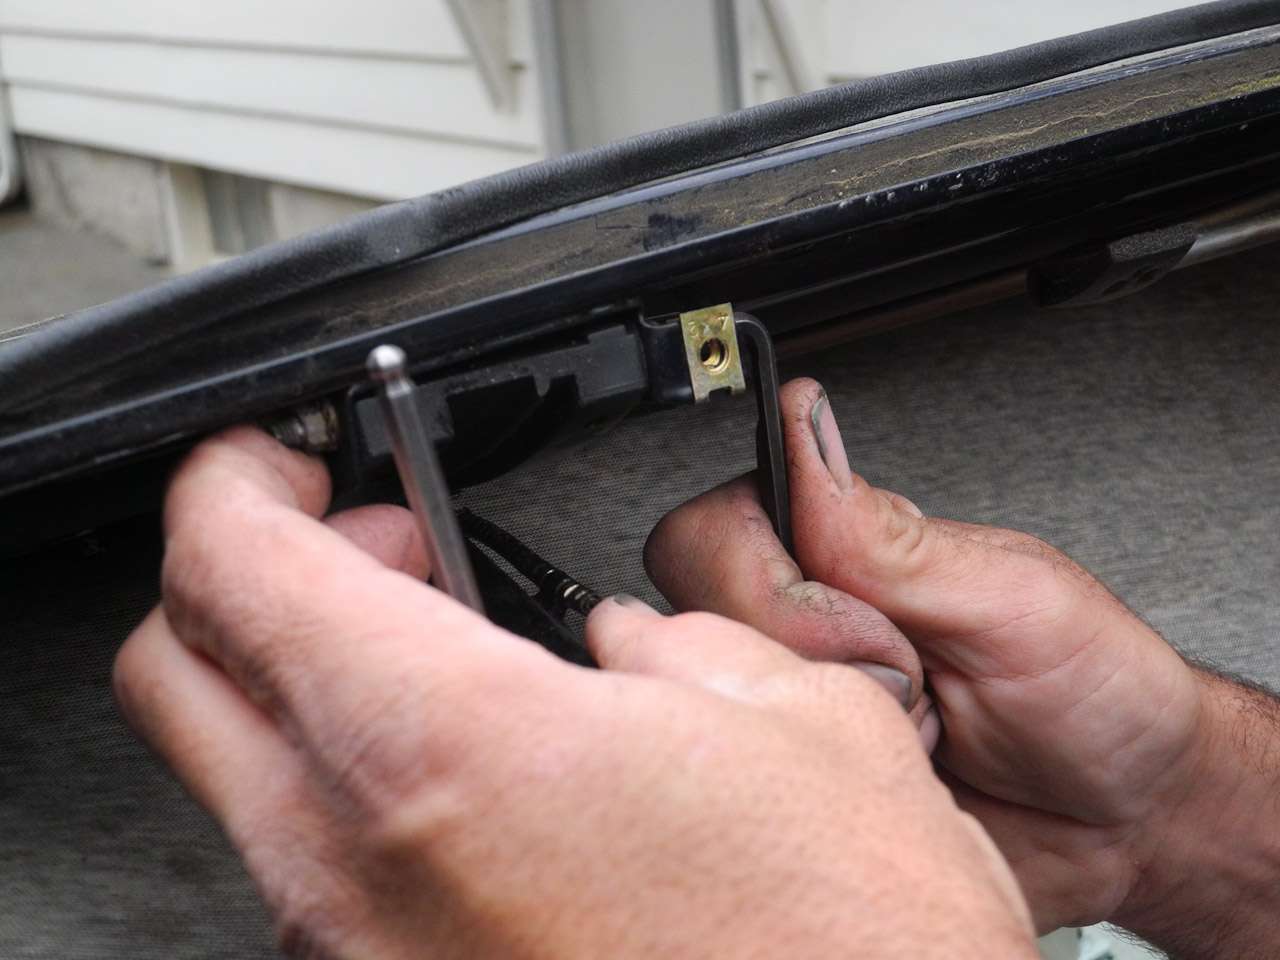
Now we turn our attention to the areas of the body where the sunroof latches will engage. We start by trial-fitting the guide pieces for the original lifting arms, and find that each has a raised area that does not provide quite the right fit and clearance when contacting the manual latch. So we gently grind and file the pieces to a state of flatness:
-10

-11

And now the roof-body interface seems smooth and flush:
-12

The final steps involve the rather delicate task of slipping the body headliner edges over the inner flange of the body sunroof opening and positioning the previously-loosened vinyl covering strip.
Finally we refit the headliner retaining panel and hope we haven’t misplaced any of its screws.
-13

-14

Not re-installed:
-15
Finished. Took about 2.5 hours (not counting over twice as much time to document this). Looks reasonably tidy even under the harsh light of direct camera flash. If I were to do it again, I would perhaps use the black gaffer tape more liberally, to further hide the blue-painted inner surface of the sunroof panel, but it is nearly impossible to see in normal light.
-16

The end result is a smoothly-operating, tightly-fitting arrangement that does not seem to leak air or water. I wish I had done this a long time ago. Who needs a power sunroof, anyway?
-17

In the first installment (Sunroof Subversion – Part 1) we identified the nasty problem of vandalized & ruined sunroof rear hinges/lifting arms and our proposal to replace this defective power sunroof setup with a manually-latching alternative. So I take camera in hand, occasionally passing Jason a tool and lending a hand, but mostly trying to stay out of the way. Let’s go.
TEARDOWN
The first task is to expose the rear sunroof apparatus, removing caps from the rear headliner retaining piece to get to the phillips screws.
-1
-2

-3

To perhaps give you a clearer context of where we are working, I am taking the liberty of grabbing the photo below from a great headliner fix tutorial by one of my very favorite 944 sites, 944Foot2TheFloor. Not only does this site arguably have the best-named blog in the 944 online interwebs universe, but it has some of the greatest tutorials of any kind you are going to find. God bless the Brits. Take a look:
944foot2thefloor …
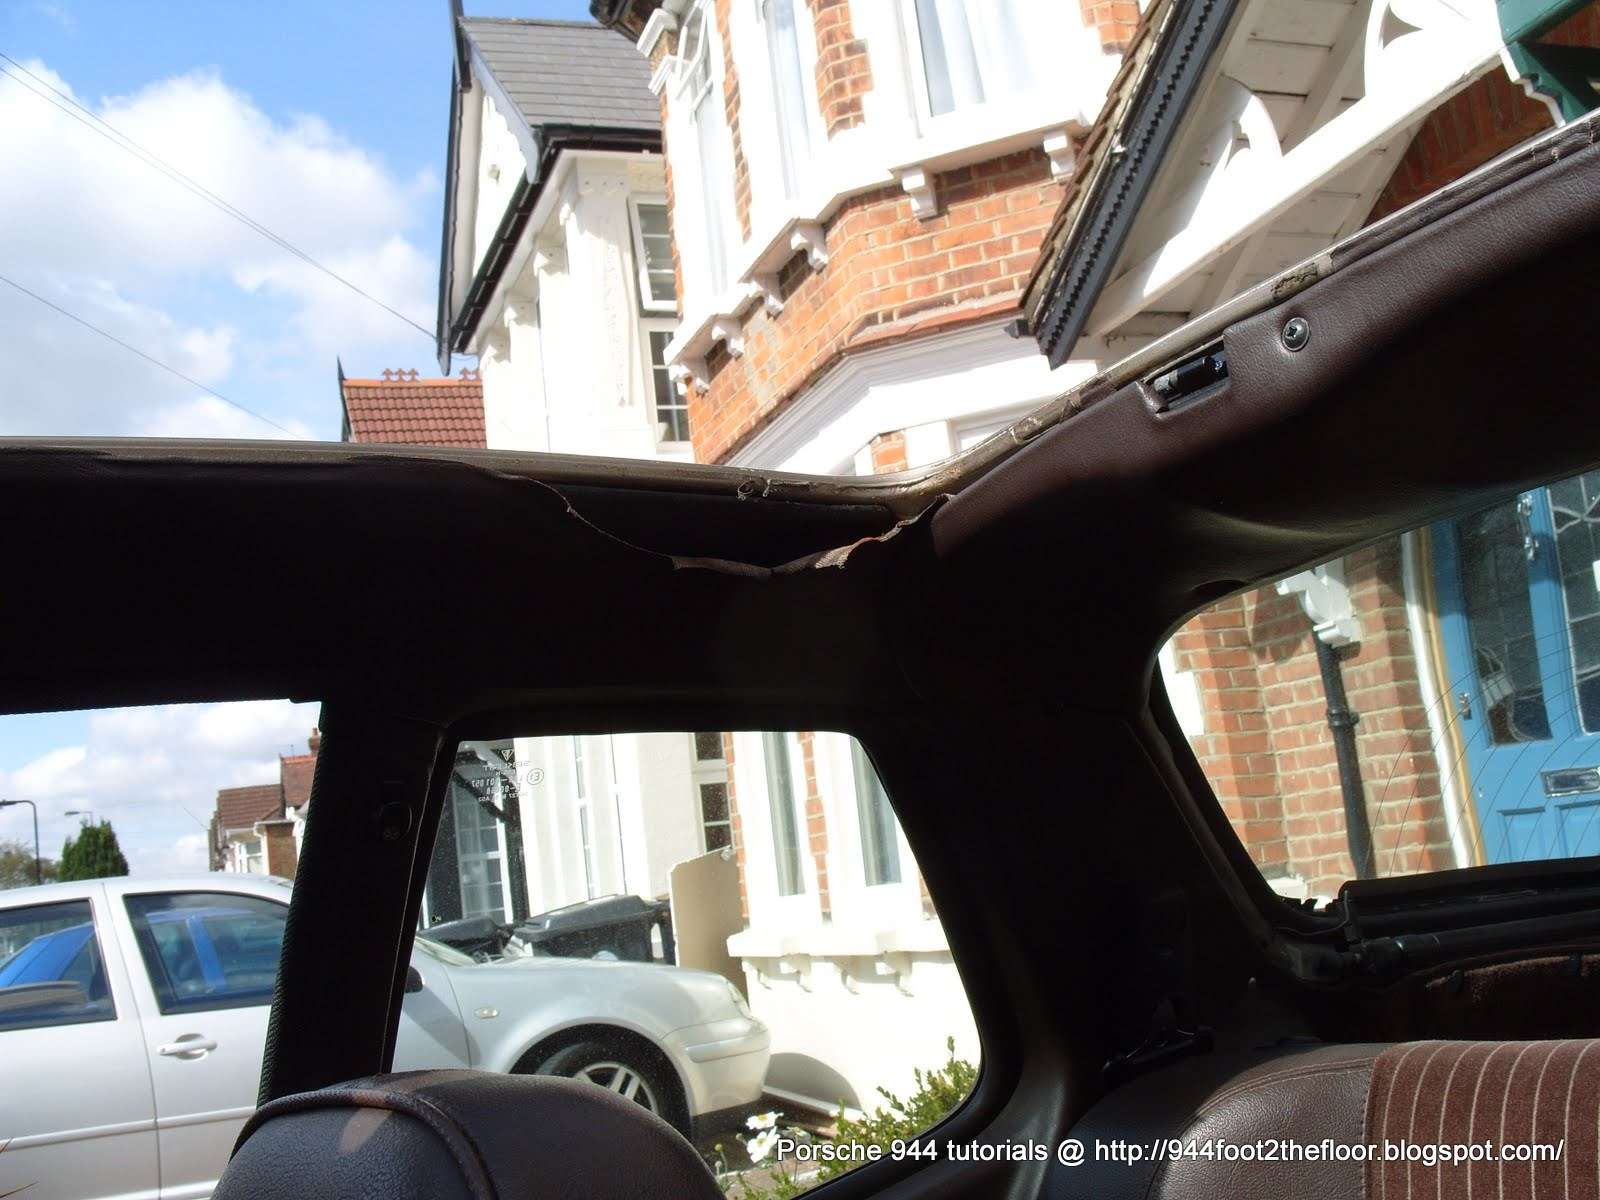
Now, back to the USA …
We can now drop the rear portion of the headliner and see more clearly the guide mechanism into which my sawn-in-half lifting arms are supposed to retract. By removing the lower retaining cover pieces of this mechanism, we can free the lifting arms.
-4

-5

-6

-7

-8

-9
Now we can address the sunroof gear assembly, which is irrevelant to our needs:
-10

-11

-12
-13
-14

-15

-16

-17

Outta there:
-18

Returning our attention to the sunroof itself, we now need to remove its headliner/cover piece to get at the female “slots” that the male lifting arms once joined with, presumably harmoniously. I lost count of the screws involved here, including those rather tricky pin/push affairs that have to be removed.
-19

-20

-21
At this point we can remove the female receptacles (don’t ask me for the official nomenclature; I haven’t found those yet in the WSMs or wherever they are documented).
-22

-23
And now we can do a trial fit to see if all is going to line up in more or less the right manner:
-24
-25

-26

Voila! Now to install the new rear manual latches for real. But as luck would have it, we have been working outdoors (in Jason’s neighbor’s driveway, as his own garage is totally overrun with his various projects) and it (the known universe) decides to rain. So we need to interrupt our work and find a new workspace. Bear with us and follow on to Part 3.
Let’s pick up from where we left off a couple of weeks ago…
BACKGROUND
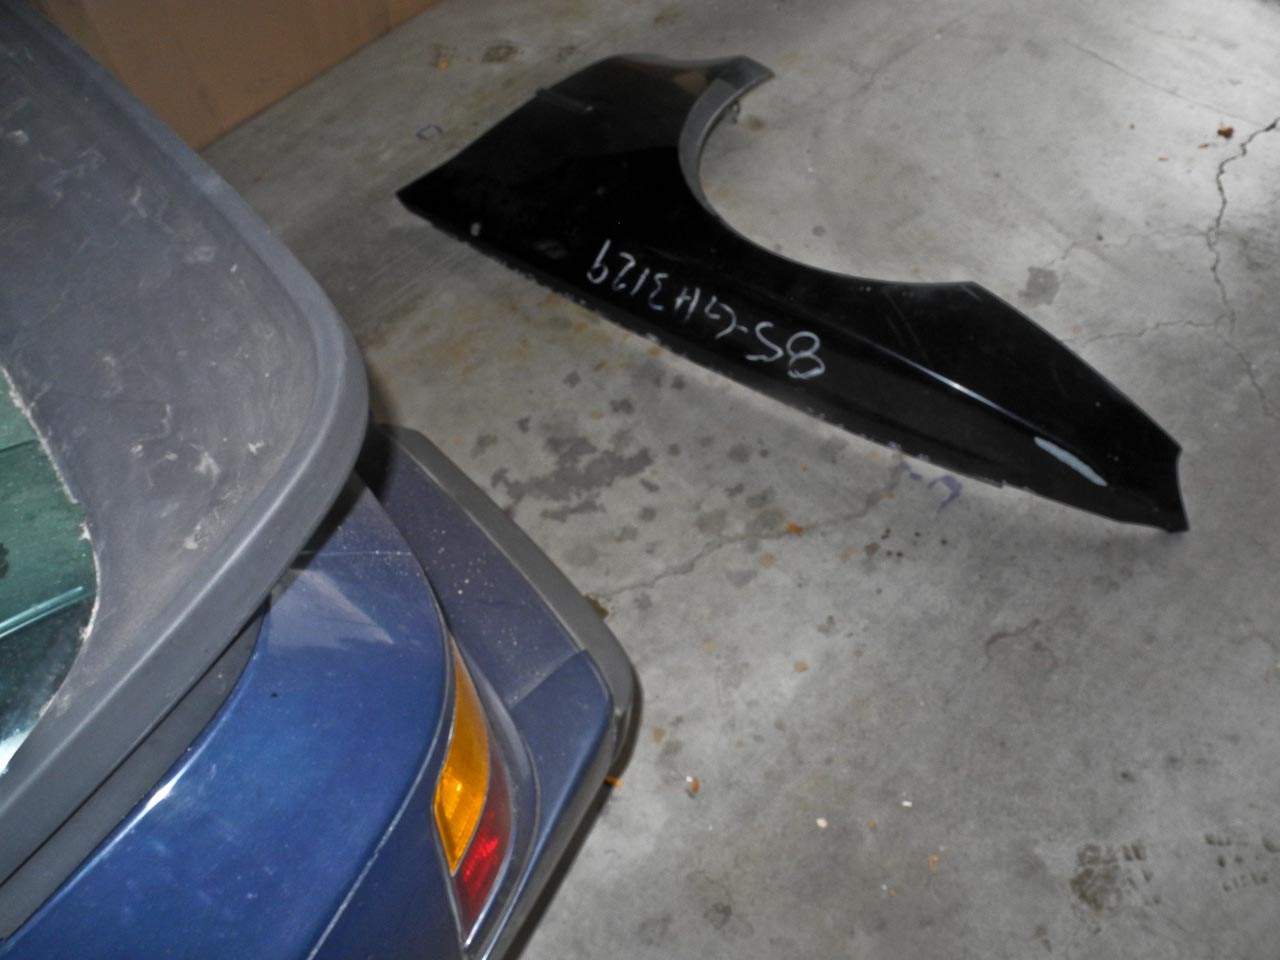
My 944’s sunroof has apparently not worked for some time, a long time. The previous owner, Michelle, told me that the previous owner before her said that the previous owner *before that* had explained that the sunroof was vandalized during that period of ownership. Seems that the car was parked with the sunroof in the open position at the rear when someone attempted to break in, unsuccessfully, by *sawing* through the rear hinges. As a result, this is what the rear body attachment points look like with the sunroof removed.

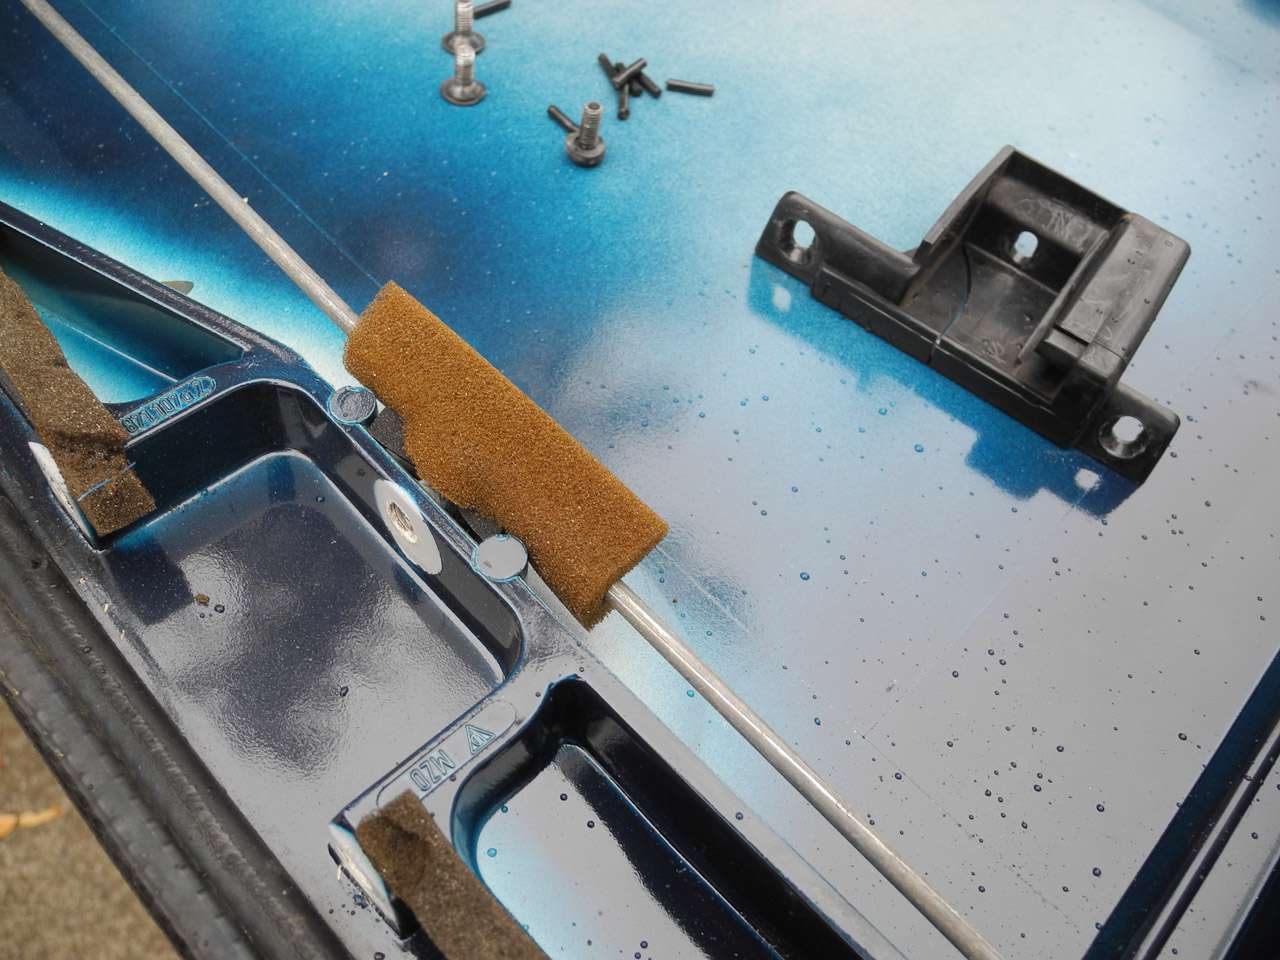
 These attachment points, or lifting arms, are quite small, measuring about 1/8 inch thick
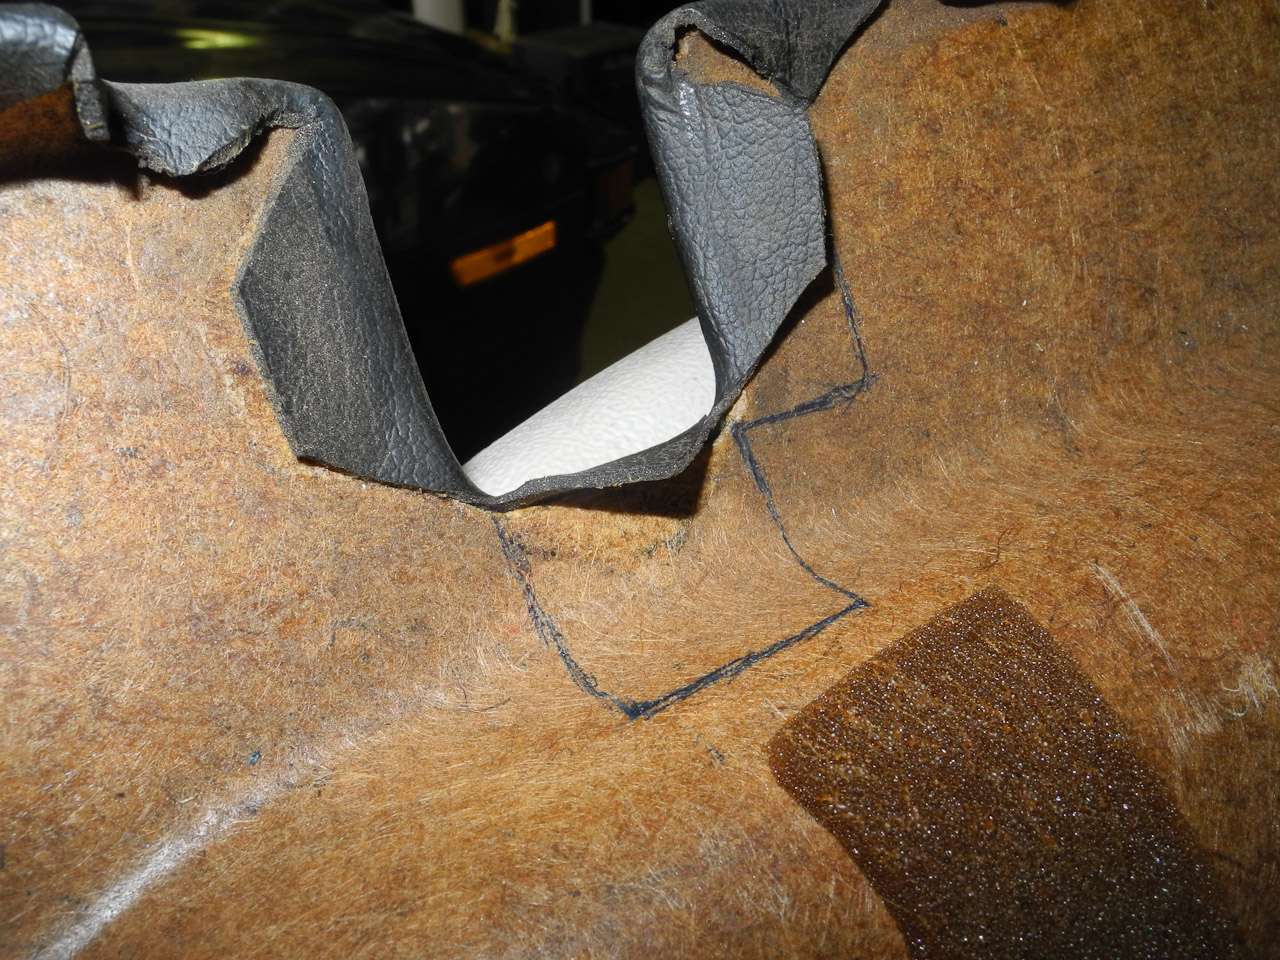
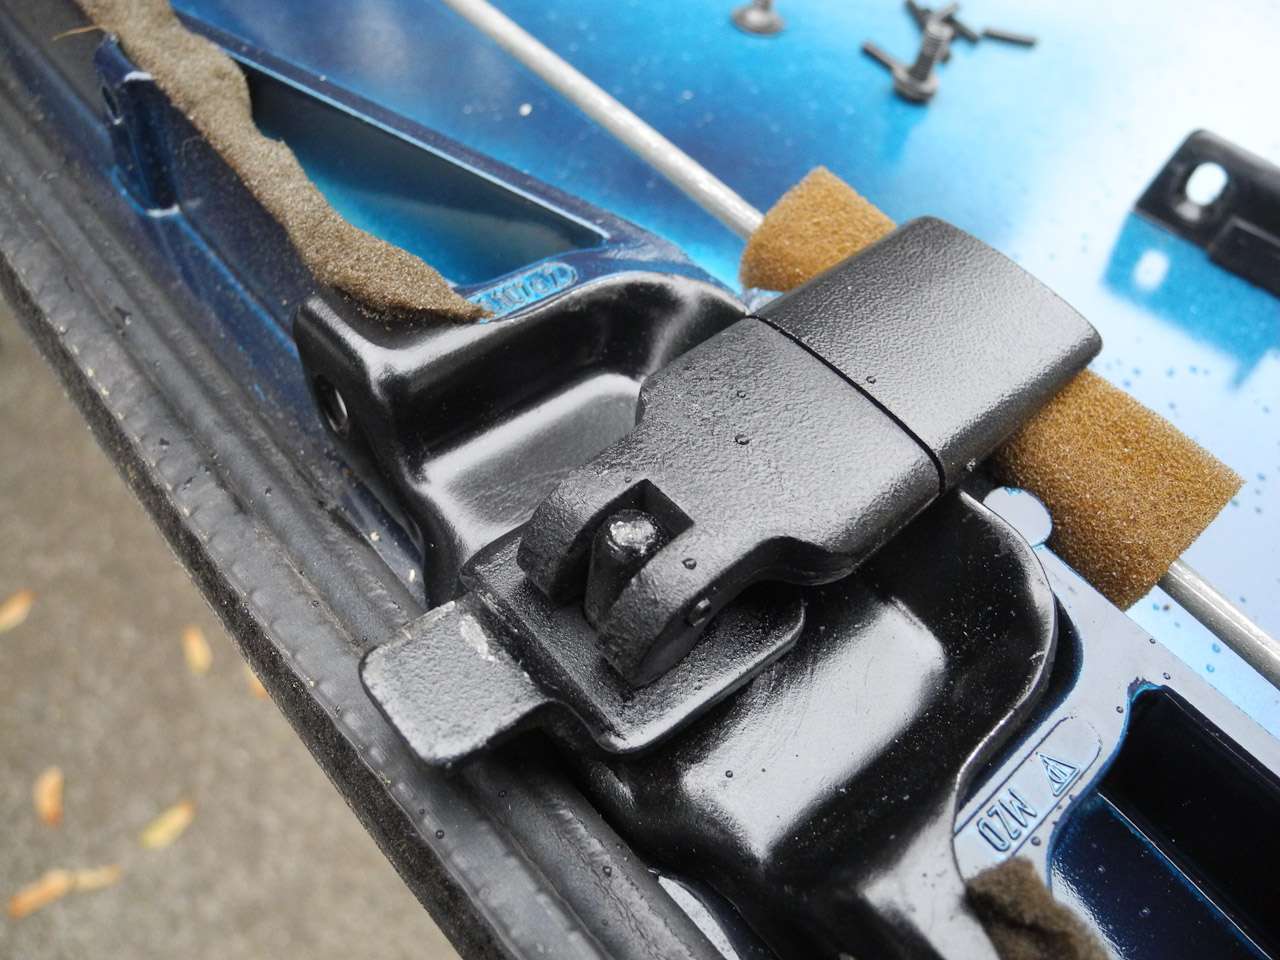
by 5/8 inch wide (don’t know how long, perhaps several inches, but they extend into the rear deck body to connect with some sort of lifting/controlling mechanism — and this mechanism was apparently changed for February 1986 and later vehicles), one near each corner, intended to mate up with the rear edge of the sunroof. I don’t have anything to illustrate how a proper sunroof looks in the rear lifted position, and I haven’t been able to inspect an actual live example. But what remains on my sunroof panel itself are two corresponding “socket” areas, which now appear like this (sunroof pictured upside-down, of course):


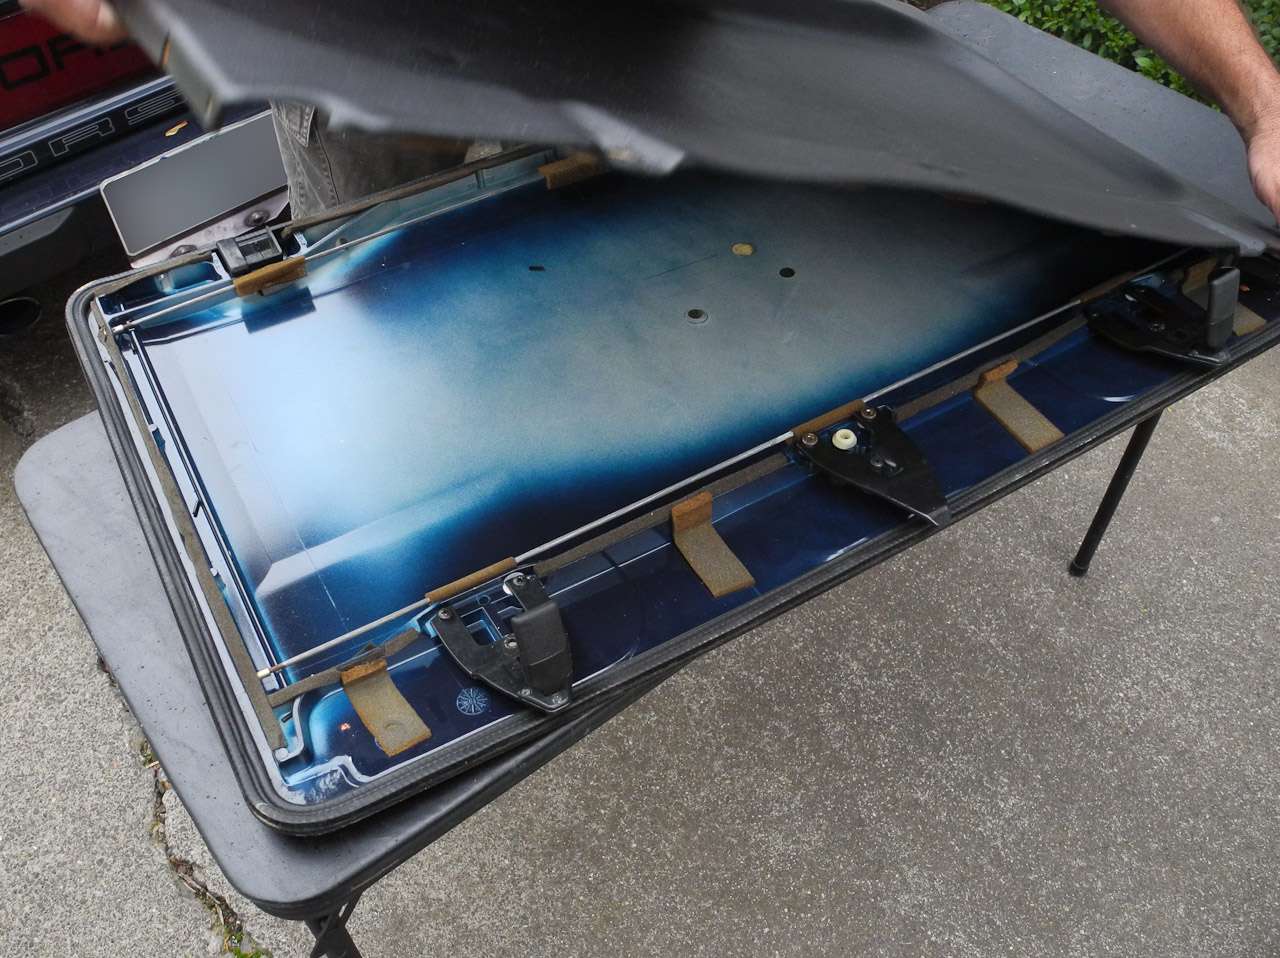
With the sunroof resting in place, but unattached:

How It Should Work
On the console just in front of and to the left of the shift lever is a rocker switch. In a properly functioning system, you should be able to (1) turn the ignition switch to “position 1”, then depress the top/front of the rocker to UNLOCK a closed sunroof, or (2) turn the ignition switch to position 1, then depress the rear/bottom of the rocker switch to LOCK a sunroof in place. This never had any effect for me, nor did I ever hear any electrical motor or any other sign of activation. Once after he checked it out, Jason did get some hum and a slight bit of movement from the sawed-off stumps protruding from the body, but couldn’t get this action to repeat again. Note that we never did go so far as to dig into the motor itself (read on to see why).


Removal of the Sunroof Panel
Since there is no connection between the sawed-off stumps from the body and the sunroof panel, it is a simple matter to completely remove the panel, starting by unlatching it at the front, as illustrated here:
Then it is possible, still inside the cabin, to reach rearward and lift up the rear edge of the sunroof, twisting it and situating it on the rear deck (and inserting it into its storage bag, if desired). However, while the sunroof panel itself is very light, it is awkwardly sized and proportioned as a one-person proposition. I prefer to stand outside, preferably with an assistant, with each of us on opposite sides of the opened doors, for much easier manipulation.

By tipping the rear edge up to angle the sunroof panel, it can then be easily pulled away from its retaining wind deflector slots as shown above. (In my case, I also have a broken hinge at the left rear corner of the deflector, an issue of much lower priority, but which will need to be addressed sometime.)
Consequences of Broken Lifting Arms and An Untethered Rear Edge
With only gravity holding the sunroof in place at the rear, flapping and fluttering at speed (especially when the windows are rolled up) is not only annoying but has obvious implications for rain or snow and perhaps a nasty lift-off. By opening the windows, the air pressure change does tend to keep the sunroof down, but that is hardly a solution in colder weather. Michelle told me that she had actually used a bungee cord arrangement before to keep the sunroof in place. I think we can come up with something better.
Why no previous owner ever repaired the sunroof is unknown to me, but I did read a forum post or two about the outrageous four-figure price some have been charged by their Porsche dealers for a fix. And let’s not feed any of my paranoia by suggesting that neglected maintenance in this non-critical area might just indicate a pattern of more wholesale neglect! I admit that I would generally prefer no fix to a bad fix for a non-business/operational-critical issue.
Potential Solutions
My first move was to check out Clark’s Garage (just about the very first site I visit for any 944 issue — thanks Clark!). The walk-through provided there appeared to be clear and thorough, but that seemed more than I wanted to take on. You can see Clark’s sunroof page here:
http://www.clarks-garage.com/shop-manual/body-03.htm
Some more research yielded a couple of YouTube videos:
http://youtu.be/GzwgAafft1Y (read the comments as the vid doesn’t help on its own)
But what I really wanted was just to manually remove the sunroof now and then, yet leave it fully closed most of the time. Don’t care about the rear uptilt-vent-thing. Then I saw instructions in an older (’83) owners manual that indicated that some of these cars had fully manual sunroofs. I reasoned that I could convert my power sunroof to a manually-latched version, and was able to verify in some forum posts that this has indeed been done. But I found no specifics on how to go about it, and even saw some conflicting information on the topic: one forum poster said it was a simple matter of just bolting manual latches into the slots on the sunroof, while another said that it would almost certainly require cutting up the sunroof and headliner, not to mention disabling and/or removing the motor and related apparatus.
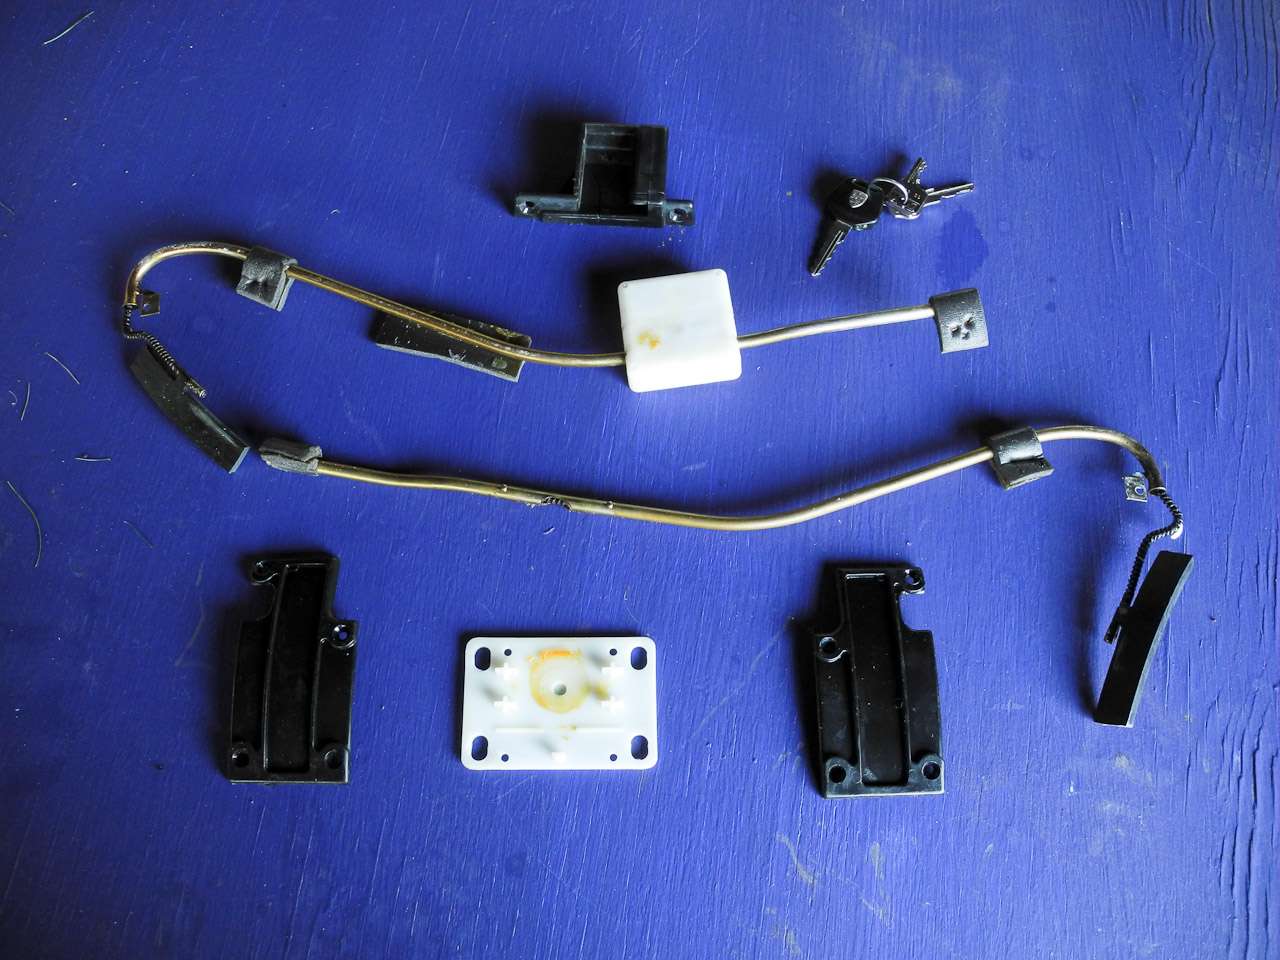
So thinking, “How hard could it be?” (almost always a flawed premise), I began a search for a set of manual rear latches. Turned out to be hard to find. I did locate a retail source for a new set, but was not about to spend the nearly $300 price. After several weeks, maybe it was months, Jason stumbled upon a used set for a fraction of that price on eBay, so I snatched them up. Here is what came in the mail:

Rear Latches – One Pair Needed (underside view)
And here is what an illustration of the usage of the rear latches from that older 1983 owner’s manual (my manual for the Blue Rascal only mentions the electrical version):

Note that this illustration shows that the latches must be swiveled to clear the bodywork before the sunroof can be removed. Looks like some surgery to the sunroof itself is likely going to be needed to gain clearance.
Okay, we seem to be ready to undertake this project. Stay tuned for Part 2.